Wednesday, November 18, 2015

Simple Spiderweb Halloween Costume

DIY! All you need is spider temporary tattoos & white yarn!!

I first applied all of the temporary tattoos starting at my wrists and doing them in zones with about four in each area to start. This way you have enough to make it up your neck without running out. Then you just fill in where you think you need it. I only did tattoos on the front half of my arms with all the spiders facing their heads towards mine. 

 Then I put on an all black outfit (best to figure out ahead of time so you know where to put your spiders) from my closet so the web would contrast. For the web all you do is tie a piece of yarn around your waist then have five pieces of yarn tied hanging vertically on the string. Next you just add as many loops as you want by giving slack to your string before you tie it to each of the five vertical strings. Continue until desired look is achieved! (I personally did six vertical with three loops in each zone). I also added a head piece web for a more flapper vibe using the same technique to tie because my head was feeling lack luster. 

WARNING: People will do a double take when you walk by because they think your spiders are real. Especially kids!! 


Monday, November 16, 2015

My Current Jobs

Job 1: I nanny for a two year old girl. (8-12 hours a week)
Job 2: I nanny for a eight year old girl. (15-30 hours a week)
Job 3: I work at a daycare. (15-20 hours a week)

Why I work with kids: (besides money)

I nanny because I love children. I always have loved children. When I get to make a positive impact on a child's day and maybe even their life I think that is the greatest way I can spend my time. 

Children keep my soul young. When we play I try not to stay in the reality I know but to jump into their world where a couch is a ship that we sail the seas on. I have forgotten how to imagine impossible things but when I get to spend my days with children I learn again even if it is only for a moment what can be. 

Kids are unburdened by bills and jobs so they are essentially happy. I am a very content person. I would say I am more happy than not BUT I wouldn't say I am always happy. My thoughts are not that of the children I watch but of bills and schedules. I enjoy the escape of the pretend where I am a horse to her cowgirl, the monster that chases her around the room, the teacher who shows her how to draw.... anything is a possibility in her world. I can be anything in the mind of a child. That is a comforting thought. 

I get tired from nannying both mentally and physically. The toll of being a horse is an exhausting one. Picking up toys or picking up a child over and over again isn't easy. Especially when that child is asleep. Mentally it is hard when you see them not want mommy to go to work but even harder when they break down and cry for eighteen minutes once she's gone. Or when mommy has been working for four days straight and she breaks down because she only gets to see her before school which isn't enough. It's also hard to be stern with them when they do anything because they don't understand danger or pain fully. 

I want a nap too! Sometimes I do end up falling asleep right next to my two year old but mostly I clean up the mess we have made. Then I prepare fun new activities or cook dinner so it's ready when she wakes up.

When I started I was worried about how I would entertain someone else for so long and just nervous in general but now that I have done it for months I don't have those thoughts. I know now that the days will be filled with anything and everything she wants to do I just have to make sure she eats her food.

While daycare is a completely different feeling. I was of course nervous but it was also because I was working with other people watching so many kids. I am still figuring out circle time which is where we teach and sing songs with our kids before we spend the day playing. I love the variety of children we get at daycare and how each day is a different combination of all of our kids. Of course I have favorites but I don't have least favorites just moments where I am not to keen on a kids behavior. It has been a learning experience for me since twelve kids can be a handful but I love seeing how similar and different kids the same age are or how advanced a younger kid can be over an older kid. 

I am enjoying every moment of working with kids even when times are more difficult it beats the idea of sitting behind a desk all day. 

Playful Pumpkin Ideas

1. Painting plastic pumpkins! I taped off a minion eye and overalls then painted both pumpkins with yellow house paint I had left over from my kitchen. Three coats of paint for the orange pumpkin and two for the white one. 


After it was dry I peeled the tape off and painted the blue overalls on. I only needed one coat because it was dark enough that nothing showed through.

Then the eyes I touched up with white and outlined in grey. All so far is house paint I had leftover from projects. Then came the black strap for the goggles and eyes which were done with acrylic paint. Lastly a tiny black mouth on each and little G logo for Gru.


2. Painting pumpkins with an eight year old! I let her pick out her favorite color and a type of glitter and then we just got a small pack of multicolored acrylics. She did solid color and then glitter over top while I did a sugar skull front/pineapple back at the request of her mama.
On the second round of pumpkins she started off with her base color then drew a cat and did her family name and all sorts of designs and of course glitter. I also did her families names in banners and then let her draw and glitter anything and everything around them.


3. Painting pumpkins with a two year old! Gave her multiple WATERCOLOR paint colors and glitter. With little little ones it is better just to let her do whatever she wants and get as messy as she wants. No matter what it will turn out cute and they are happy you didn't take over the project in search of perfection.


4. Painting my own pumpkins!! These are Halloween creepy themed pumpkins for my sisters party. I quickly painted these which I think was helpful because I didn't overthink what I could do. Took a total of five minutes tops on each pumpkin. Good centerpieces! Also jack from different angles is so cool!!
5. CARVING! I know it isn't to many peoples favorite way to do pumpkins now but I like the tradition of it. Downside is it only lasts a week before it gets gross. I just carved a classic face and made him goob-ish. All with one tool the standard one that comes in all carving packs and the scraper that isn't a giant spoon.


Monday, October 5, 2015

How to deal with Wisdom Teeth

So this is my experience and tips that could help you if you are about to go get your wisdom teeth pulled. This is just based off what I wanted and needed each person I am sure is different. For me personally my teeth/ holes where teeth use to be did not hurt me throughout these days you will see. My trouble was the swelling. I was swollen always throughout the day and for good fair few days. Also I talked a lot every day even if my mouth didn't open very wide which probably wasn't the smartest. Anyways here is my experience summed up and tips.

Tip: Take a video of yourself on the car ride home. It is something memorable and could be funny to go back and watch. Who cares if you don't look cute you just had oral surgery. Me: 

DAY 1 
Tip: ICE PACKS. Ice your face constantly. The swelling for me was the worse part. My teeth didn't hurt but the swelling made my face heavy and annoying. So ice, ice, ice. I only took the hardcore pill once right at the beginning and then took Tylenol normal strength instead of the hardcore drug.

 
                                   DAY 2
Tip: Sleep a lot this day. Wake up to take your pills and then try to sleep. While you are awake keep icing your face. The swelling feels like hard plastic just pulling on your jaw. It will be a nuisances!             


        DAY 3
Tip: Warm wash cloth feels amazing but don't forget to keep icing your face. Also mashed potatoes are heavenly.


 DAY 4
My bruises started showing up on this day. Swelling going down but still present. Kept taking pills and occasionally iced. Rinsing mouth with salt water since cant fit toothbrush in.

DAY 5
Tip: Eat things you don't mind just swallowing. Spaghetti O's were awesomely easy to eat. Iced more because swelling started to get bigger again. 

DAY 6
Tip: Laugh. I watched my video of the ride home and all the stuff I was saying with my family and couldn't help but crack up which is tough and tiring for the mouth that wants to stay small BUT I found it super effective on loosening my muscles. 

SORRY NO PICTURE
of day 6

DAY 7
 Bruises really shining through but swelling down significantly.Mostly swollen on inside so lots of accidental cheek biting. Still eating pretty soft low key foods. 

DAY 8
Still swollen on inside. Started to try eating more chew-able food with success but took time. Bruises still evident. Brushing front teeth with toothbrush.

Today is DAY 10 since getting my wisdom teeth pulled. I can finally open my mouth to a reasonable level (though a fat cherry tomato is still to big to fit between my teeth when I open my mouth). I can brush my teeth fairly well without worry of catching my stitches. I am no longer taking any medicine. My gums still feel a little swollen but nothing like before. Because they feel a little swollen I still rinse my mouth with salt water at least once a day to kill bacteria. I can feel everything happening in my mouth when I eat right now which is strange because before my wisdom teeth were evicted I wasn't this hyper aware of the workings in my mouth. Chewing is a workout! It takes me an hour to eat three cinnamon rolls or three chicken stripes. Meals are not quick and probably wont be for a while.

DIY Halloween Wreath 2

Take a trip to the dollar store first things first and buy all the cute things you want to put into your wreath. I bought $20 worth of things and ended up only using $10 worth in the wreath.

This wreath is witch themed.
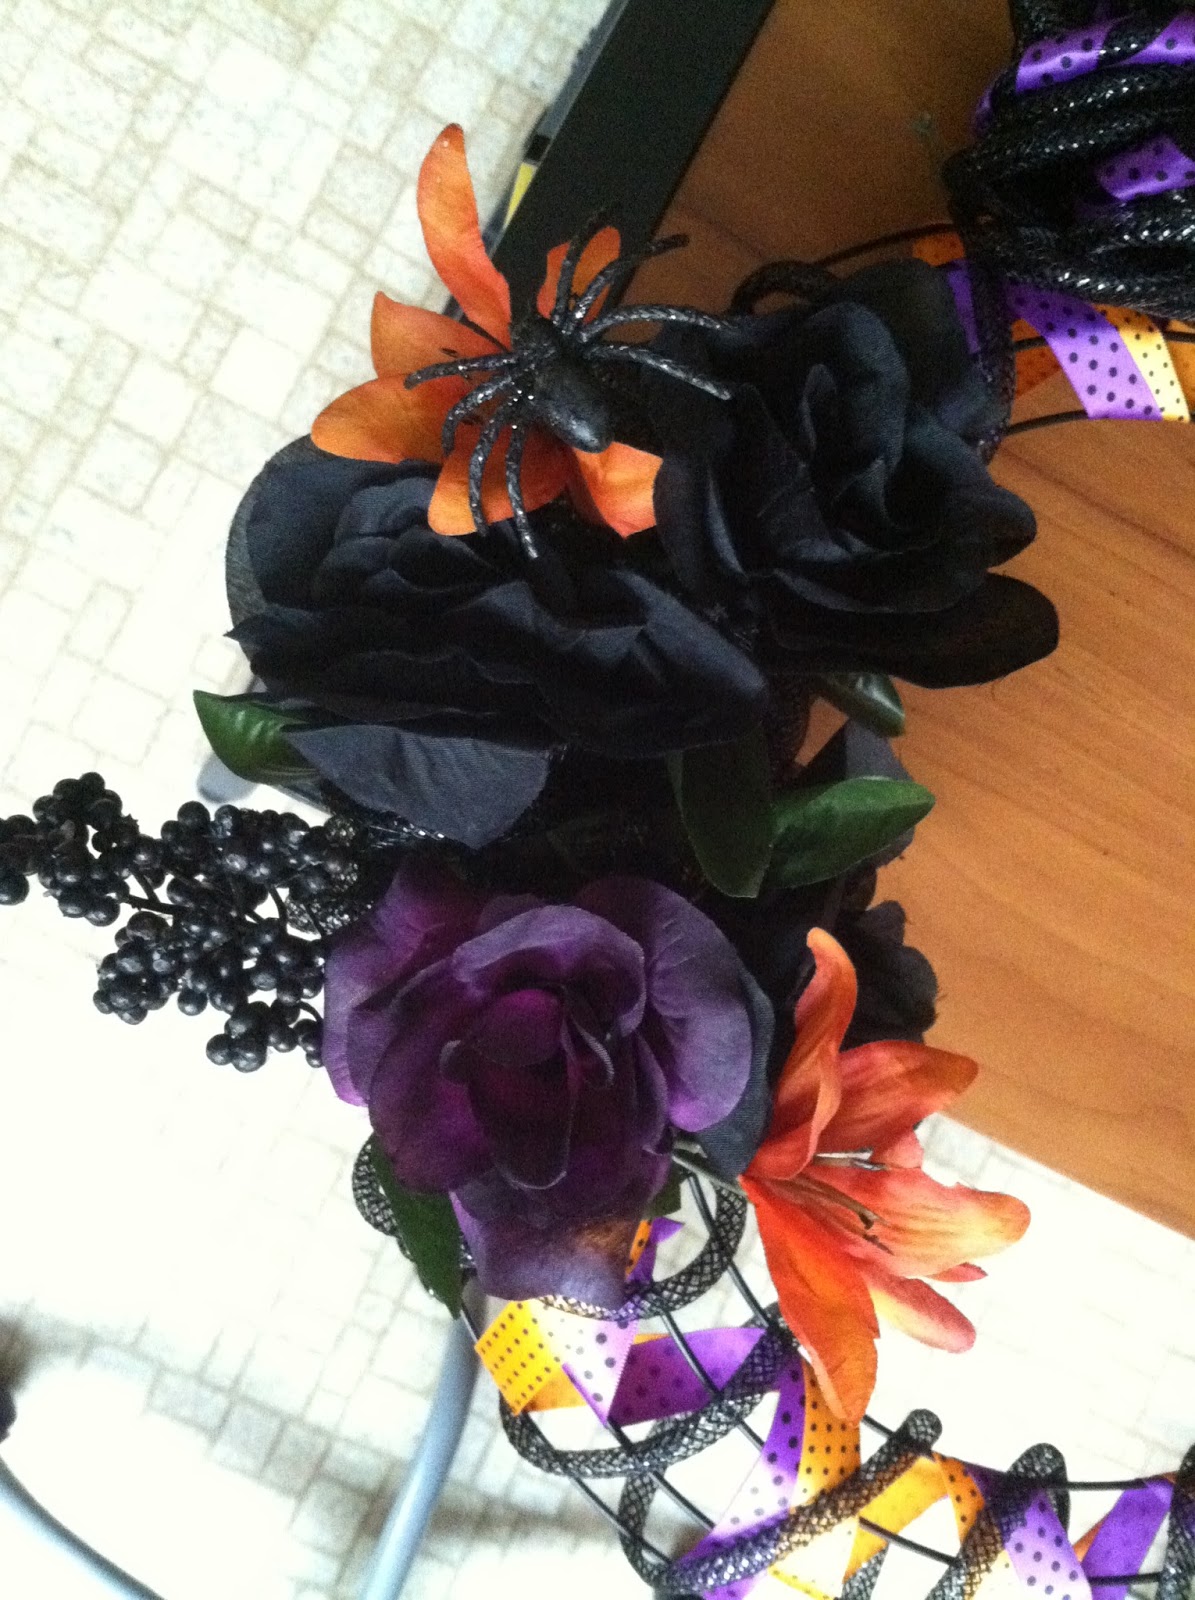
First I played around with the idea of flowers on one side to give it that feminine touch. I was playing with the blacks, purples and oranges to see what worked.


Then I took the two colors of ribbon I liked most and wrapped them around in a repeating pattern. Start by tying one end to a starting point then string your ribbon. Pulling tightly as I went so there was no room for the ribbon to slide around. Then tie it off at your ending point. I am leaving room so I can do a flower piece.

Next I created a bow by making a loop wrap around about ten times and then tying a knot in the center to give it that bow look. With the excess I started wrapping it around the wrath in no particular pattern just kept it going around since the black ribbon was so long. 


With the excess orange and purple ribbon I wrapped it around a few of the black loops in the bow. This just gives it a extra special pop.

Then for the flowers! It is totally a person choice how many you put on. I choose to only do a little bit because I was loving how the wreath looked and didn't want to over power it. One purple rose, two orange flowers, three black roses and black glitter berries. Also a spider because it is Halloween after all.


After the flowers were placed I took a spiderweb I got from the store and tied it onto the wreath with some little string. I also cut up a holiday card that had the perfect witch silhouette on it. It was a yellow card so I decided to cut a moon shape out behind her so the scissor work would be a little easier. I mounted her on with some tape and a string so that she would stay secure.
 

Once the witch was secure the wreath was finished. 

 All we needed was orange, purple and black ribbon, two flower bundles, a holiday card, a spiderweb, a wreath frame and a wreath holder. Then of course a door to hang it on.

Creativity can take you a long way! This was the second one I have made ever. Can't wait for the next time I get to make one.