Thursday, September 24, 2015

DIY Halloween Wreath

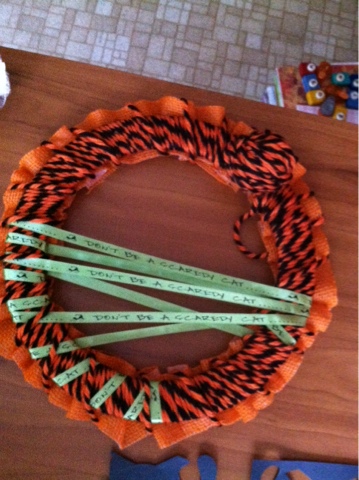
Nothing's better on a front door than a wreath. Typically they are more a Christmas thing BUT I DO NOT CARE. So I started off with this circle hoop thing I found at Micheal's Craft store, holiday ribbon that says "Don't be a scaredy cat" and some orange and black mixed yarn. You want to start by wrapping the color you want for a majority of the wreath all the way around...Tightly!


Next I took the holiday ribbon and strung it around the circle. If I could get the whole sentence to cross the wreath I would run it across and then back again. Then just wrap, wrap, wrap until I could get the sentence again to cross the wreath. This makes for a good caution tape effect with the words and the solid green backs crossing. I just taped it on because I am trying not to cut anything so I can reuse again in a new way next year.
For the next fun detail I took an orange burlap ribbon I got from Target. I folded the ribbon accordion style and ran a piece of thread through the center of it. Before tying the thread off I made sure the ribbon was stretched wide enough around to make a circle the size of our wreath.
I then began to wrap more of the black and orange yarn around the burlap ribbon to  secure and keep its shape and place. As I was wrapping I adjusted the folds in the accordion so that they were more evenly spaced all the way around.  
With the left over yarn I wrapped it up into a tight ball and pinned it on to look like a ball of yarn which fits with the scaredy cat theme.
Lastly I cut out a cat shape with a spare piece of black paper and stuck it in between the ribbon, Simplest step and you can go with whatever cat shape you feel like drawing. It is customizable. (I chose to not cut out eyes because I didn't want to get an exacto-knife out but you totally can.)
TA-DA! I love it.

Saturday, September 19, 2015

DIY Halloween Banner

Super easy Halloween banner that looks great! I started off buying two burlap banners (one orange, one black) from Target for $3 each. The banner comes with eight triangles which frankly I couldn't think of anything to write with only eight spaces so instead I took apart the two of them.


You want to start by taking all of the triangles off except one only because then you'd be putting it right back on if you took it off. Then from your opposite colored banner you take the triangle and put it next to the triangle still on the string. 


Remember there is a front and a back to these silver nubs so if you are a stickler for perfection you want to make sure you notice this before you string your entire banner up. As you are stringing the triangle on you'll end up with two different strings of eight all alternating colors so the next step is to tie the two strings together. Make sure the sides you tie together have opposite color triangles.


I did a tight knot in the middle and a loop knot on each end of the banner so I could slip the loop onto a nail.

Now for the letters! Also at Target I got these packs of burlap letter stickers (again one in orange and one in black) for $3 a set. Out of all the things I could have wrote on my banner I chose Happy Halloween which is fourteen letters and now that I made my two banners into one I have sixteen letter spaces it works perfectly! In grabbing the letters I needed I started with the second triangle in to the banners opposite color. Does that make sense? 


I evened out where I wanted the letters to go because they cant be too low but if they are too high they get a bit cut off by the string. Here you find whatever works for you. I tried to keep mine all perfectly the same when you can also but every other one higher for a curvy effect. These sticker letters are so easy to use and super sticky!! Peel off the back plastic and stick wherever you would like. I did make a mistake and it was easy to pick the sticker up and move it to the real spot I wanted without any hassle.  
 

When you are all done find a spot and hang your creation!


Thursday, September 10, 2015

Trying nail art

How to Galaxy toe nails!
 
I used a deep blue, grey, purple, confetti/glitter in silver and blue, medium blue sparkles and black.

First I painted a coat of the deep blue once it was dry I used a q-tip with some of the grey lightly on the end and sponged all of the nails and repeated same process with the purple.
 
After sponging was dry I painted the two different glitters on an let them fully dry. Lastly I used the black to top coat each nail. Before you use the black though you want to wipe off any big glops of the nail polish that might cover all the work you've done 100%. The black is more of a dark see-through cover you want to deepen the rest of the colors. 
This is a zoomed in image of my big toe nail. (Zoomed in because a picture of my foot is not that awesome.) It looks like galaxy print to me. It's mostly about having fun and loving your outcome. 


&Sparkly finger nails 

Which has actually turned out to be one of my favorite ways to paint my nails now. It is simple and looks great. I can't stop staring at them and bonus I am continuously getting complements on them. 

First paint all nails using a gloss with teeny tiny sparkles then once it is dry on the tips you use a bigger sparkle in any color of your choice. You will probably have to do multiple coats of the bigger sparkles on the tip so that it's nice and thick.

Happy painting!!

Hair Transition

Over the summer I got over eight inches cut off so my hair went from quite long to much shorter than I have had in a long time. Don't think I didn't like having long hair because I loved it. Something about long hair feels sexy especially when I took the time to curl it.That was always a surefire way to make me feel better about myself. I also loved rocking a french braid or even side braid.


 BUT that wasn't really what I had been wearing. I got stuck in a hair rut and mostly wore a standard ponytail or even a bun. No frills to be seen. Life got hectic and long hair felt like a nuisance.  


So even when my schedule freed up my hair still felt sad and annoying. Occasionally I would have a fabulous hair day but normally it stayed pretty blah. So I decided a change was needed. A. BIG. HUGE. CHANGE. and chop it was gone.


 As the scissors cut my head felt lighter and the hairs on the back of my neck tingled. (Haircuts feel great don't you think?) At first glance I will admit I was not thrilled with how it looked but I loved how it felt so light, airy and laughable (as in it felt like a laugh). I could not stop touching it for days. It was so strange to buckle my seat belt and not have to move my hair out from under it or hold my hair as I rolled up the window. Now I didn't have to put it up before eating or swing my head all the way to switch what side I was facing on my pillow.

Though I was stumped on what to do with it. Braids didn't really seem like an option nor the tiniest ponytail and I am slightly afraid to curl it. I did find that they all were speaking the truth when they said it is easier to wash and dry shorter hair though I still shed just as much. **They being everyone who ever told me short hair was easier to clean and dries quicker. Since then I have worn my hair a few ways. Braided back the bangs into a half floral crown type thing and then the other was braid back the front sections of my hair into five separate sections and bobby pin them down.


So that is my hair transition and I am still playing around with it. Best part about hair cuts is they grow out and you can do new things with them later. Thanks for reading!

Monday, September 7, 2015

Painting My Front Door

GREEN!

I wanted to paint my front door to be a statement piece so that when people come over to my house it is the first thing they see. Then they can know that this is my place and that color is a thing they will see quite a bit of here. I chose green firstly because it is my favorite color and secondly because if it is good enough for Bilbo it is good enough for me. I am a nerd what else can I say. 

I finished painting my front door the other day. Before I could paint I had to sand off the shiny layer that was on top of my wood door since it had never been painted a color before. If I painted over that shiny layer the paint more than likely would have peeled off sooner rather than later. I then taped up the edges, peephole, lock and handle. Before painting I put newspaper all over the floor under the door so that if paint leaked it would not stain my floor. I proceeded to paint it with a white base coat that is a paint and primer blend before applying green paint. The primer will help keep my color lasting longer on the door. My door took a whole pint which is about four or five layers to really get into all the nooks an crannies of the wood. So if you are doing this project you should not have any plans for the day seeing as you cannot shut your front door because it it wet.


This picture was after three coats of paint. From a far it looks solid but as you got closer the cracks/nicks in the wood were not filled. I left to nanny once my third coat was dry and came back to finish it up after. 

I absolutely love having a green front door. I get excited when I see it coming home or leaving. I take a little longer locking my door because I am to busy thinking what a great color it is. Bilbo would agree I think. But my absolute favorite part about having a colored door is when you are inside and you open it. The rim around your door lights up with the reflection of the doors color. It feels magical! 
 
This picture doesn't do it justice but its the one that came out the best (you can also see the wood color the door use to be). Sometimes its the simple things in life that make me smile the most.

Hope you enjoyed this little painting inspiration.
TTFN!

P.S. I might not even be done with it. It might eventually evolve! I could paint the wood panel lines and the bolts onto it.
 

And maybe I could add the thief's mark Gandalf scratched in Bilbo's door if I want to go really into the Hobbit theme.


On the inside of my door I could even do something to mimic this gorgeous inside of his door since the inside of mine is still brown as well.

Image result for bilbo's door

The possibilities are endless. Dare to dream big!


Saturday, September 5, 2015

Far Away Friendships

How I deal with long distance friendships.

Some of my favorite people in the world do not live near me at all. One lives 24 hours away which is roughly 1,717 miles while another lives 45 hours away which is 3,152 miles. That is no hop, skip and a jump. Though I do have friends only 5 1/2 hours away or 342 miles and even closer friends 32 miles away which is a 40 minute drive if the highway through the mountains isn't at a snails pace. These are my closest and most trusted friends and I only get to see them in person maybe once every year or two. I will admit that it totally sucks! If I could buy a huge plot of land and have each of them put a house on it so we could be neighbors I would but that is unrealistic. So what I do is rely heavily on technology. 

Technology I have found useful:

Texting: I probably use this more than anything else. It is helpful because if they are busy or asleep I know eventually they will get my message. I can send pictures to them as well of funny things that remind me of them or of myself so they don't forget what I look like. It is an easy way to have prolonged conversations. Though the conversation is lacking dimension because you do not get to see or hear the other person which are my favorite parts of talking to my friends it is something you sacrifice to keep in touch. 

Instagram: I am constantly uploading new pictures of what I am doing onto Instagram because then my friends can be updated on my life whenever they feel like it since I can't really talk to everyone all the time. The little tidbits I share reflect what I would want to tell my friends about. Vice versa with my friends who have Instagram as well. I comment on their photos so they can see I am still thinking about them even if I don't have time to call.

Phone calls: I actually like talking on the phone but its harder to do than any of the others. Signal plays a huge factor on my phone call experience. Without good service its a static mess of what do I think they are saying since I only hear every other word. Because I don't want to risk the call dropping I use to get off work at ten at night and go sit in my locked car in the parking lot chatting away. Right now I am in a constant game of tag with one of my friends where I actually leave voice mails saying "tag your it" because we are always missing each other. But when I do get a hold of one of my friends we talk for hours if signal provides it. 

Video chat: I am giving this one a shot recently because I like that it uses wifi so I don't have to have a good signal. I have found though it is a bit weird to use. Trying to find something to lean your phone against with a normal angle so your friend isn't looking up your nose is key. What ends up happening after the conversation is had is that nobody really wants to hang up but there is nothing else to say so both parties just work on something in front of them and leave video chat open mostly so you can glance up at the other person with occasional small talk about what they are doing.


Technology I haven't found useful:

Facebook: There are to many news articles, quizzes, links to random sites, commercials, videos being shared I hardly see a normal status written by a human I know. Most of my long distance friends are hardly on their facebooks anyways because they are working or at school but also the fact that it is like being in the yahoo news section now I think a lot of my close friends are turned off by it. Occasionally I update my pictures so that various family members scattered around the states can get updates about what I am doing but nothing much else. I don't even go on other peoples pages that often because I don't feel like scrolling through all the shares they have going on.

Twitter: None of my friends use this or have kept up with this. It is to much effort to post what you are doing all the time and I am in no way clever enough to think of something witty to post on a daily basis. (Though I love reading random funny tweets from celebrities.)


I want to start writing letters to my friends. Hand written on paper sent through the post office messages. I think that receiving a letter could be amazing and that it would give my friends something tangible from me. In the digital age mail is more of a treat now unless it's bills. I want to do this so that if they miss me they can read the letter I have taken time to write instead of scrolling up in their phones to a text that might have made them smile. 

Long distance makes me sad sometimes. I don't get to participate in big moments anymore and worse not even small moments. A simple hug from each of my far away friends is something I crave. I miss them. I miss the smiles, laughs, jokes and advice they give me. Each person is so different and unique its amazing I found them all. So even though it is hard to be so far away and so conversationally disconnected the best part about loving all of these weirdos is that I know they love me too.  

I have not perfected the long distance friendship method and I frankly do not want to. I want to see my friends more than once every two years and talk to them more than just randomly but for now we are all apart but even though we don't keep up to date on everything I know they love me always. And as my 45 hours away gingery firecraker said "everyone's busy but the love never stops flowing".


TTFN!